Gypsy Makeup Ideas for Face, Eyes, and Lips

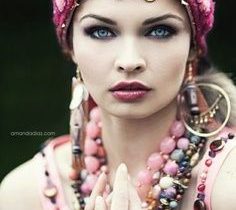
Colours, heavy ornaments & the aura of mystery…that is what the gypsy has often connected with. These wandering people, who immigrated to Europe from India in the 14th century, are recognized to have a different style & fashion of their own. If you love the idea they dress up & put their makeup, this is a post for you. Read on to understand gypsy makeup including costume ideas.

Gypsy Makeup for Face

• Choose the foundation that is a shade or two darker than the original skin color. This will assist you to accomplish the suntanned look. Your face, as well as the neck, should be evenly coated with the foundation therefore that you get the natural look. Remember you, the original meaning of gypsies describes them as nomadic people by dark hair color & dark skin tones.
• Dab any blush on the cheeks. Begin from the cheek bones & sweep the the upwards towards the ears.

Gypsy Makeup for Eyes

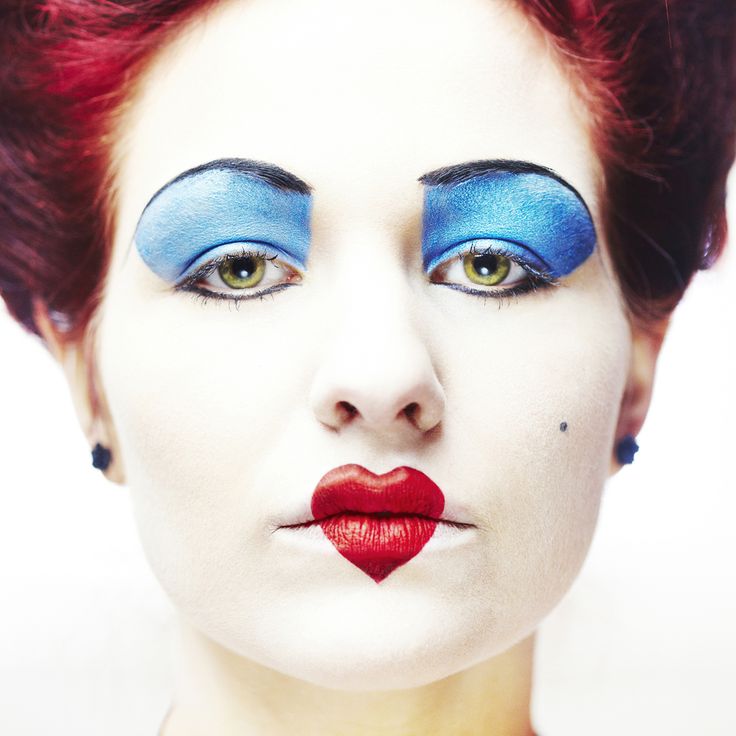
As the ‘mysterious’ eyes form a vital part of the gypsy makeup look, try concentrating on that first. Receive the grip of jet black eyeliner & eyeshadow in dark shades. Shades related dark plum or deep gray look fabulous. Now follow the following steps-

• Use the makeup brush and apply eye shadow. The eye shadow should certainly stand out.
• It is preferable to receive the hold of two shades of the similar eye shadow color. The darker shade would include the eyelids during the lighter shade should include the areas adjacent the lids. The eyeshadow should go away the corners of your eyes & then, fade away.
• Soon, apply the eyeliner, close to the eyes & apply it thickly.
• Begin with the lower lash line by the special center on the inner corners. Continue the line of the bit behind the outer corner.
• Now apply it on the upper lid of the eye following your lash line exactly. This should extend to the outer corner of the eye.
• Repeat the same method for both the eyes.
• Slant the line of liner on several of the eyes’ bottom portion to look line an extension of your eyeliner. This can be accomplished by drawing a half-an-inch line from outside corner of your eyes.
• Both the elongated lines should meet & fall a tad upward curve, somewhat line the cat’s eye.
• Load the lashes with jet black mascara. 2 to 3 layers of mascara would be good.
• Do not forget the eyebrows. If they are not that dark, make certain you fill the brows by some dark brown liner or eyebrow pencil.

Gypsy Makeup for Lips

• If you need the eyes to be the center of attraction, use lighter shades of maroon, red, or purple.
• If you need the gypsy makeup to be definitely colorful, go for dark lips.
• Do not neglect to sweep any gloss on the lips.

Conclusion

So, the right sort of makeup & accessories ease to accentuate the gypsy look & it is essential that the invest in them well before you need to try out this look. It is the look that you may need to sport in the theme party or a go-as-you-like get collectively with friends; you want to carry it with confidence & it has confirmed that you DO NOT try it for an Indian family party!

DIY Homemade Egg Deep Peel Off Face Mask

Are the facial skin pores clogged? Or are you possessing blackheads? If yes, then clearly these must be the cause of worry for you! You do not want to worry. We would share with you very effective DIY Homemade Egg Deep Peel Off Face Mask that can assist you deep clean the skin pores & eliminate blackheads.

Yes, those peel-out masks also act as great as any pore strips! Because the pore strips & peel off face masks can steal the pocket & go to the spa is also more expensive, why not apply this simple DIY pore strips that you may make in just fifteen minutes that also in the comforts of the home.

Ingredients:

(i) Gelatin: 2 packets, plain & unflavored (allows ability to peel off)

(ii) Green Tea: 1/2 cup, brewed (any tea of your option)

(iii) Egg whites: 2

(iv) Lemon: ½, freshly squeezed lemon juice

DIY Homemade Egg Deep Peel Off Face MaskMethod:

(i) Take the egg, break it & depart the yolk from the white. Whisk the egg white till it turns foamy, Store the egg white aside, you will require it later.

(ii) Pour the green tea into the glass bowl. Combine the lemon juice & combine well. Mix in two packets of gelatin, & stir well.

(iii) Microwave it for 5 to 10 seconds to blend the mixture well. You can have to microwave it again after some time if it has not mixed well.

(iv) Allow the mix cool down to room temperature or you may keep it in the refrigerator for this purpose. Stir in the white egg & mix it well.

(v) Apply the mask onto the face, using the brush or your fingers. You require making it the thick sufficient layer to make a peel-off effect. Apply one layer let it for some time, & then combine another. If you feel it is still not the thick layer, join the third coat.

(v) Allow the mask on for approximately twenty to thirty minutes, till it dries out. Do not leave it for extra time or it will make super tight & you would not get the pull off the effect. Peel it off, & clean your face with the lukewarm water.

You may like to read:

DIY Homemade French Green Clay Face Mask


Miracle Homemade remedy Drumstick leaves juice for Menstrual Pain

The menstrual cycle begins for the female as soon as she becomes 12 to 13 years of age. For a few, it may be soft, but for a few, it is one of the serious experiences that they require to undergo each month as the menstrual pain gets intolerable. Read about Drumstick leaves juice for Menstrual Pain.

For those who can follow natural homemade remedies, they want to have drumstick leaves juice. It assists relieve the menstrual pain.

Some of them get the pain as their date of periods begins approaching, although a few of them suffer from the pain during menstruation & the pain happens in the lower abdomen. The severity of the pain ranges from small to severe, & all that the female needs at that point in time is to reduce the pain immediately.

In order to reduce the pain, one sway takes up certain medication rules but of all, natural home remedies have ever been the greatest. Drumstick leaves juice for Menstrual Pain
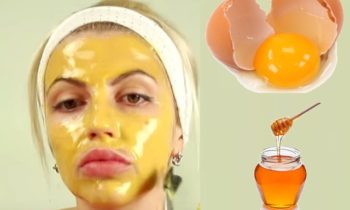
The greatest part regarding natural home remedies is that those do not cause any side effects & are very safe.

Therefore why the pain? If the uterus contracts to suspend its lining during menstruating, this points to severe pain in your lower abdomen.

Drumstick leaves juice is one of the largest natural components that aids to build up the iron content in your body & refresh the body with nutrients. This aids in controlling the proper blood flow & therefore eases the pain.

How To make Drumstick Leaves Juice:

1. Take some drumstick leaves & rinse them precisely with water.

2. Grind the leaves and extract the juice from it.

3. Now strain the juice & then join regarding a teaspoon of honey to the about one by the fourth the cup of this drumstick leaves juice.

4. Mix it well & then drink the juice ahead in the morning on an empty belly for the first 2 days of the periods.

5. This drumstick leaves juice aids in relieving menstrual pain.

Caution: Drumstick leaves juice is effective in relieving the menstrual pain, but one should be cautious as well. If the pain is difficult, insists for the longer period of time or it happens every month then it is enough to consult your family doctor.

Benefits of using Almonds For Skin Whitening

Almonds are especially good for your skin care. They are excellent in vitamins. Almonds can use in the sort of face packs or because the scrub to assist whiten your skin. If you have looked in to review how to use almonds for your skin care, Then continue reading Benefits of using Almonds For Skin Whitening.

Our skin requires a plenty of aid in staying flexible & soft and to support its happiness, especially now, when the world is becoming more polluted day by day & the stress levels are rising. As no material what you like to think, your mental status does have the tremendous impact on the overall appearance.

The next time somebody tells you that smiling can improve you look more beautiful, do not simply glare it away. As it’s true. However, regrettably, it’s not reasonable to always have an improvement mood. That is where simple components like almonds can move in to make the skin glow how it has naturally deemed to.

And almonds are so varied as a skin care component that you can combine it with an ample of other components to obtain the desired effect. Almonds are comprised of vitamins & minerals that your skin just loves. So, try out these natural home remedies to practice almonds for your skin whitening.

1. Almond & Milk:

Soak almonds throughout the night and grind them into the powder form next morning. Mix this powder with milk & apply this as a pack. You can smoothly massage it if you like. This enhances blood circulation on the face, making the skin glow, while the lactic acid makes the skin fairer.

2. Almond & Honey:

Honey is the natural humectant that assists keep the skin moisturized & even helps eliminate dead skin cells. Almond powder assists with dead skin elimination too, that makes this the perfect pack to defeat the dull skin.

Benefits of using Almonds For Skin Whitening3. Almond & Papaya:

Combine powdered almond by few mashed papaya & a little water to assist get rid of dull, dead skin & to also increasingly slow down the growth of the facial hair. Papaya comprises enzymes that assist break down the hair follicles.

4. Almond & Oatmeal:

Make the paste with oatmeal, almonds, & water. Join this in a blender, as it is difficult to do this by using the hand. Apply this paste all over the face & smoothly massage the face. The granules will assist get rid of your dead skin cells. This is also great for people with sensitive skin.

5. Almond & Sugar:

If you are admiring how to apply almond for skin care, make a blend of almonds, powdered sugar, & water to get this astonishing scrub that soothes the skin and assists overcome the dead skin cells at the corresponding time.

6. Almond & Banana:

Bananas support naturally nourishes & moisturize your skin. Mash half of the banana and join almond powder in it. Therefore, this is like the face pack & scrub all in one. Wow!

7. Almond & Olive Oil:

And for the easiest remedy to reduce the dull skin, mix powdered almond by olive oil to receive a further moisturized & radiant skin.

Arbi or Taro root Masala Vrat Recipe for you!

Navratri means new dresses, lights, dandiya dance, fun, and extra fun. If ‘Dandiya’ is the performed in East of India, ‘Dhunuchi Naach’ of Bengal is the real pleasure and enjoyment to the eyes. Read about Arbi or Taro root Masala Vrat Recipe for you!.

And when it happens to before-mentioned a big festival, you cannot neglect specific cuisines. From Bengali’s ‘Kosha Mangsho’ on Navaratri to ‘Jalebi with Rabbi’ of UP can do you go crazed on the festive days.

In various households, men & women keep active on Navratri. You will require recipes for fasting that are healthy & delicious. Arbi masala is one such famous dish of North India that has made when Navratri for those who are fasting.

Related thalipeeth or sabudana ki khichdi, it is the various light dish that keeps the energy on though you fast & enjoy Navratri.

Arbi masala curry recipe is before-mentioned a dish to keep busy during the day while fasting. Do you recognize how to make it? Great, follow this easy recipe below.

Arbi or Taro root Masala Vrat Recipe for you!Ingredients:

1. Arbi (Taro root): 10 to 12
2. Ajwain : half teaspoon
3. Turmeric powder : half teaspoon
4. Red chili powder : half teaspoon
5. Garam masala powder : half teaspoon
6. Oil : two tablespoon
7. Water : two cups
8. Salt as per required
9. Few strands of mint and coriander For The Masala Paste
10. Tomatoes : 3
11. Green Chilli :1
12. Ginger : half inch
13. Cumin seeds : one teaspoon

Method:

  • First, wash the arbis well & put inside the pressure cooker. Wait for about two whistles.
  • Now, remove the water. Peel off the taro root and cut them into 2 to 4 pieces. Keep it away.
  • Then, take all components for paste & put those in a blender. Blend everything well to make the perfect masala paste.
  • Now, heat the pan. Combine oil in it & sauté ajwain.
  • Combine the masala paste you have cooked. Stir the mix, so that it does not burn from the base.
  • Combine rest of the components. statue well.
  • When you notice the masala leaving oil, salt, combine water and cooked arbis.
  • Keep the fire over low-medium & allow the vegetable cook well.
  • When the gravy begins to thicken, join chopped coriander & mint or pudina leaves. Your arbi or taro root masala curry is available to serve.